 Easter is a lovely time of year and a great opportunity to get together with family and friends. Traditionally, children receive chocolate eggs or an egg filled with sweets – maybe from the Easter Bunny, but sometimes just from Mum and Dad!
This is a lovely custom (and I know my children LOVE it) but when the Aunties, Uncles, and Grannies get involved, there can be quite a lot of chocolate!!! And packaging….. There are heaps of ideas on the internet about what to give the kids as a healthy alternative to Easter Eggs – I’m not sure what kind of kid would want a painted egg shell instead of a chocolate egg but there you go….
This led me to think about reinventing the recent craze of ‘bliss balls’ or energy balls. Why not egg shaped energy balls…let’s call them Easter Energy Eggs???
Easter Energy Eggs
If you’ve ever tried energy balls I’m sure you’ve honed your own favourite recipe and they really can be anything you want them to be. Nutty, no nuts, cacao or chocolate (most chocolate is not sugar free so decide what you’re aiming for and read the packaging), any combo of seeds you like or have to hand, dates or any other dried fruit for sweetness (apricots work well too). Not sweet enough…?? Add a dash of honey!! They are so easy to make too – soak, blitz, freeze and shape, coat/decorate. So here they are, my Easter Energy Eggs.
Step 1: Soak your dried fruit in boiling water. I used about 1.5 cups of dates. Not medjool dates as I haven’t won the lottery yet, just good old dried dates.
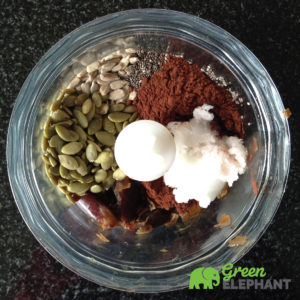 Step 2: Drain your fruit base and add to your processor bowl with all the other ingredients. I used roughly 0.5 cup of seeds including sunflower, pumpkin and chia. You could use any kind of nut or seed for this – just see what you have in stock! For flavour I added 2 tbsp of cocoa powder (organic and fairtrade is best) and the zest of an orange. Add 1 tbsp of coconut oil for binding and blend to a paste.
Step 3: Check the texture of the mix. If it’s firm, you can shape right away but mine was still warm and sticky so it went in the freezer for roughly 30 minutes to get a ‘shape-able’ consistency.
Step 4: Shape. Scoop out spoonfuls of the mix and shape into eggs with damp hands. Whatever size you want, but bear in mind these treats can be quite rich so don’t make them too big. I made about 12 with this recipe. And don’t forget these are handmade treats. The love that goes into these negates the need for perfect egg shapes!!
Step 5: Refrigerate or freeze until firm while you melt the chocolate.
Step 6: Coat. As I mentioned earlier, most chocolate is not sugar free but there are plenty of sugar free, organic and vegan options out there if you need these eggs to satisfy a special diet. I used a mixture of good old Whitakers 60% dark chocolate and 5 roll refined milk chocolate to coat mine. I’m not too worried about properly tempering the chocolate so I just melted around 200g in a glass bowl in the microwave. Just break the chocolate into small pieces and melt in 30 second bursts, stirring in between. You should only need it to be in there for 1 – 1.5 minutes before it’s perfectly smooth. Now for the fun part. Drop your eggs into the melted chocolate and turn using a spoon so they are completely covered. Remove carefully, letting any excess drip off and position on a non-stick surface to set. And there they are, your Easter Energy Eggs in all their glory.
These beauties are best kept in the fridge until they are eaten, but they can handle a short while on the bench stashed in a colourful egg carton on Easter morning…… They won’t last long after that!!

